How to Make Desk Jet Cartridge Work Again
Z7_3054ICK0KGTE30AQO5O3KA30N0
hp-concentra-wrapper-portlet
![]() Actions
Actions
HP Printers - Black or Color Ink Not Printing, Other Print Quality Issues
This certificate is for HP DeskJet Ink Advantage 4535, 4536, 4538, 4675, 4676, 4678, Envy 4511, 4512, 4513, 4516, 4520, 4521, 4522, 4523, 4524, 4525, 4526, 4527, 4528, OfficeJet 4650, 4652, 4654, 4655, 4656, 4657, and 4658 All-in-One printers.
The quality of a printed document or photograph is not as expected. The procedures in this certificate should help with streaked or faded printouts, color or black ink non printing, documents with blurred or fuzzy text, ink streaks or smears, and other impress quality problems.
note:Rough handling at the shop or during installation can cause impress quality problems with newly installed ink cartridges. If you encounter print problems with newly installed ink cartridges, wait for a few hours for the automated servicing routine to complete, and then try to impress over again.
Stride one: Reinstall the print commuter (Windows simply)
If y'all cannot print colour from a Windows computer, uninstall and reinstall the printer software. Skip this stride if your printer is able to print in colour.
-
Remove the printer from the devices list.
Try to print. If these steps resolved the outcome, y'all do not need to continue troubleshooting.
Step 2: Use 18-carat HP ink cartridges
HP recommends that y'all use 18-carat HP ink or toner supplies. HP cannot guarantee the quality or reliability of non-HP or refilled cartridges. If you do not use genuine HP cartridges, the steps in this document might not resolve the issue. To check the actuality of your cartridges, go to the HP anti-counterfeit webpage (in English).
HP ENVY 4511, 4512, 4513, 4516, 4520, 4521, 4522, 4523, 4524, 4525, 4526, 4527, 4528, OfficeJet 4650, 4652, 4654, 4655, 4656, 4657, and 4658
| Ink cartridge description | N America, Asia Pacific (excluding China, India, and Indonesia) | Western Europe | Africa, CIS, Latin America, and Middle East | China, India, and Republic of indonesia | ||
| Black ink cartridge | HP 63 Black HP 63XL Black | HP 302 Black HP 302XL Black | HP 123 Black HP 123XL Black | HP 803 Blackness HP 803XL Blackness | ||
| Colour ink cartridge | HP 63 Tri-color HP 63XL Tri-color | HP 302 Tri-color HP 302XL Tri-color | HP 123 Tri-color HP 123XL Tri-colour | HP 803 Tri-colour HP 803XL Tri-color | ||
HP DeskJet Ink Advantage 4535, 4536, 4538, 4675, 4676, and 4678
| Ink cartridge description | Latin America | Asia Pacific | Europe, Center East, and Africa | |||
| Black ink cartridge | HP 664 Blackness HP 664XL Black | HP 680 Black | HP 652 Black | |||
| Color ink cartridge | HP 664 Tri-color HP 664XL Tri-color | HP 680 Tri-color | HP 652 Tri-color | |||
Purchase replacement cartridges and other supplies from the HP Store or local retailers.
If yous are using genuine HP ink cartridges and the impress quality is unacceptable, continue to the next step to bank check for ink smears on the back of printouts.
Step 3: Cheque for ink smears on the back of printouts
If there are smears of ink on the back of your printouts, you can apply an automatic tool to resolve the issue.
-
Brand certain the printer is loaded with plain white paper.
-
On the printer command panel, swipe the display to the left, and then touch Setup
 .
. -
Touch Tools.
-
Swipe up on the display, and so touch Clean Page Smears.
The printer slowly feeds a blank page.
-
Wait for the printer to eject the blank folio.
Try to impress. If the print quality is unacceptable, continue to the next footstep to make sure you lot are using the advisable paper for your print task.
Footstep 4: Make sure you lot are using the appropriate paper for your impress job
Use the post-obit guidelines to make sure the newspaper you are using is appropriate for the impress job. If it is not, reload the printer with an appropriate paper blazon.
-
Load the newspaper print side downwardly in the input tray. Many papers have printing and nonprinting sides, such equally photo paper and envelopes. Unremarkably, the smoother side is the "print side," and sometimes the non-print side has a logo of the paper manufacturer on it.
-
Practise non use wrinkled or curled paper. Utilise but clean, wrinkle-free paper.
-
Use the correct newspaper type for your project.
-
For everyday text documents, plain paper with ColorLok applied science works well. Newspaper with ColorLok engineering science is industry-standard newspaper that works well with HP ink.
-
For documents with dense printing, such as high contrast graphics or photos, use HP Advanced Photograph Paper for best results.
-
Some newspaper might not absorb ink besides equally others. If your prints smear easily, make sure you are using a recommended paper.
-
-
Store photo newspaper in its original packaging inside a resealable plastic bag. Store the paper on a apartment surface in a cool, dry place. Load x-xx sheets of photo newspaper only when you are ready to print, and and so put the unused newspaper back in the packaging.
-
Try using a different paper. This determines if the problem is related to the newspaper.
Afterwards checking the paper, endeavour to print again. If the print quality is unacceptable, go along to the next pace.
Step v: Check the print settings
Check the print settings in your operating system to make sure they are appropriate for your print job.
notation:Impress settings vary past operating organisation and software program.
Afterward checking the print settings, try to print over again. If the print quality is unacceptable, continue to the adjacent pace.
Stride 6: Check the estimated ink levels
Low ink levels tin can affect print quality. Check the estimated ink levels from the printer control console.
notation:Ink level warnings and indicators provide estimates for planning purposes only. When an indicator shows low ink levels, consider having a replacement ink cartridge available to avoid possible printing delays. You do non need to supervene upon ink cartridges until print quality becomes unacceptable.
On the printer command panel, touch the Ink icon  to display the current estimated ink levels.

-
If whatsoever of the ink cartridges are low on ink, continue to the next step to supersede the ink cartridge.
Step 7: Supersede any low or empty ink cartridges
Replace whatsoever low or empty ink cartridges, and and so endeavour to print again.
-
Plough on the printer.
-
Make sure to load the printer with patently, white paper.
-
Gently grasp the handles on either side of the printer, then raise the ink cartridge access door until it locks into place.
The carriage moves to the center of the printer.
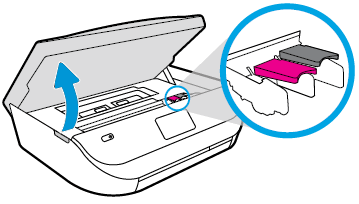
-
Look until the carriage is idle and silent before you proceed.
-
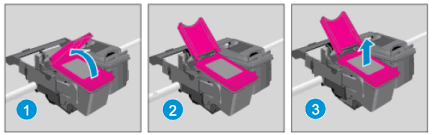
To release the ink cartridge, lift the lid on the ink cartridge slot, then gently push the lid back until it stops.
-
Pull up on the ink cartridge to remove it from the slot.
-
Lift the lid
-
Gently push button the lid back
-
Pull upwardly on the ink cartridge
-
-
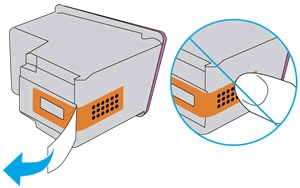
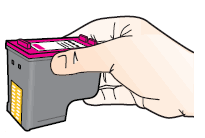
Remove one of the new ink cartridges from its package. Be careful to merely touch on the blackness plastic on the ink cartridge.
-
Remove the plastic tape from the ink cartridge.
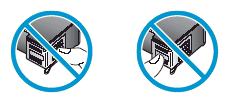
circumspection:
Do not touch the copper-colored contacts or the ink nozzles.Do not replace the protective record on the contacts. Handling these parts tin can effect in clogs, ink failure, and bad electricalconnections.
-
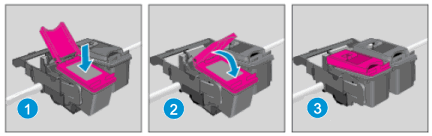
Hold the ink cartridge past its sides with the nozzles toward the printer, then slide the ink cartridge forward into the slot.
-
Close the lid on the ink cartridge slot to secure the ink cartridge into place.
-
Insert the ink cartridge
-
Close the lid
-
The color ink cartridge is on the left, and the black ink cartridge is on the right
-
-
Echo the previous steps to install the other ink cartridge, if needed.
-
Close the ink cartridge access door.
Afterwards you install new ink cartridges, the printer automatically prints an alignment page.
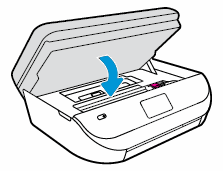
-
Wait for the alignment page to fully eject from the printer.
note:
Before a print job, the printer automatically extends the output tray extender. Do not push button in the output tray extender until the print task is complete.
-
Lift the scanner lid.
-
Place the alignment folio with the print side down on the scanner glass. Position it according to the engraved guides around the glass.
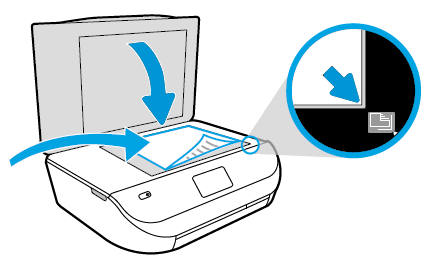
-
Close the scanner chapeau, then touch OK.
The printer aligns the ink cartridges.
If replacing the ink cartridges resolved the event, you do not need to continue troubleshooting.
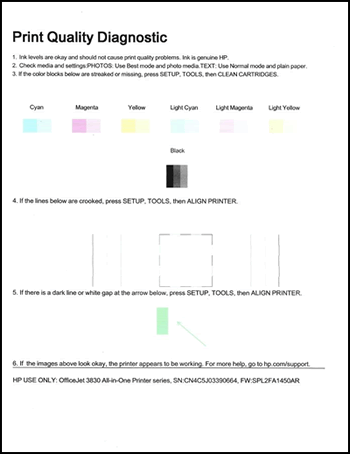
Stride 8: Print a Print Quality Diagnostic study
Print a Print Quality Diagnostic report from the printer control panel, then evaluate the results.
-
Make sure to load the input tray with plainly, white paper.
-
On the printer command panel, swipe the brandish to the left, and and then touch Setup
. -
Touch Tools.
-
Swipe up on the display, and and so bear on Print Quality Written report.
A Impress Quality Diagnostic report prints.
-
Proceed the Print Quality Diagnostic written report for easy reference later in this document.
Continue to the next pace to examine the color blocks on the Impress Quality Diagnostic report.
Footstep 9: Examine the color blocks for defects
Examine the color blocks on the Print Quality Diagnostic report to make sure the color blocks do not show white lines and are non faded or missing.

-
If any of the colour blocks show white lines, are faded, or are missing completely, continue to the adjacent step to clean the ink cartridges.
Footstep 10: Clean the ink cartridges
Cleaning the ink cartridges can better print quality. Clean the ink cartridges from the printer control console, and then evaluate the results.
note:To avoid issues that require cleaning, always turn the printer off with the Power button.
-
Brand sure to load the input tray with plain, white paper.
-
On the printer control panel, swipe the display to the left, then impact Setup
 .
. -
Touch Tools, then touch Clean Cartridges.
The printer prints a Print Quality Diagnostic report.
-
Examine the print quality on the Print Quality Diagnostic report.
-
If the print quality is acceptable, click No. You can stop troubleshooting.
-
If the print quality is unacceptable, click Yes when prompted to perform the next level of cleaning.
note:
If the printhead is badly clogged, it might require some other cleaning wheel. If so, wait 30 minutes before yous perform both levels of cleaning again.
-
Go on to the next step to examine the alignment lines and green color block on the Print Quality Diagnostic report.
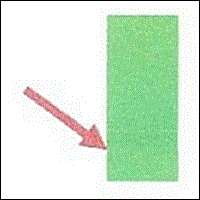
Step xi: Examine the alignment lines and green colour block for defects
Examine the alignment lines and green color cake on the Print Quality Diagnostic report. Make certain the lines are straight and connected and that in that location are no dark lines or white gaps in the green color cake.

-
If yous see no defects on the Print Quality Diagnostic study, the print mechanism and ink cartridges are working correctly. If print quality is still not satisfactory, try these general print-quality guidelines. You do not need to continue the troubleshooting steps in this document.
-
Make sure the epitome you are printing has a high enough resolution. Images that have been enlarged might display fuzzy or blurry.
-
If the problem is near the edge of a printout, use the print settings to rotate the paradigm 180 degrees. The problem might not display on the other terminate of the printout.
-
Do not leave unprotected ink cartridges out of the printer for an extended flow of time.
-
Always use the power button to turn off the printer. This protects the ink cartridges from exposure to air.
-
-
If any of the alignment lines are non straight and connected, or the green color cake has nighttime lines or white gaps, keep to the next stride to marshal the printer.
Step 12: Marshal the printer
Aligning the ink cartridges correctly aligns the printhead with the printer. Align the printer from the printer control panel, and so evaluate the results.
-
Make sure to load the input tray with plain, white newspaper.
-
On the printer control panel, swipe the display to the left, and then impact Setup
. -
Bear upon Tools.
-
Swipe upwardly on the brandish, then touch Align Printer.
An alignment page prints.
-
Wait for the alignment page to fully squirt from the printer.
note:
Before a print job, the printer automatically extends the output tray extender. Do non push in the output tray extender until the print task is consummate.
-
Lift the scanner hat.
-
Identify the alignment page with the print side downwardly on the scanner glass. Position information technology according to the engraved guides around the drinking glass.
-
Close the scanner chapeau, then touch OK
The printer aligns the ink cartridges.
-
Try to print again.
-
If these steps resolved the issue, y'all can stop troubleshooting.
-
If the printout shows rails marks or smears, continue to the next step to manually clean the surface area effectually the ink nozzles.
-
If these steps did not resolve the issue, and the printout does not bear witness rail marks or smears, skip to the step to supplant the problem ink cartridge.
-
Step 13: Manually clean the area effectually the ink nozzles
Practise not perform these steps unless the printout specifically shows smeared text or track marks. Clean the area effectually the ink nozzles if y'all see track marks or smears on the printouts.
| | |

-
Get together the post-obit materials:
-
Dry foam-rubber swabs, lint-free cloth, or whatever soft material that does non come apart or go out fibers (coffee filters piece of work well)
-
Distilled, filtered, or bottled water (tap water might contain contaminants that can damage the ink cartridges)
circumspection:
Do not utilize platen cleaners or alcohol to clean the ink cartridge contacts. These tin damage the ink cartridge or the printer.
-
-
Turn on the printer, if information technology is not already on.
-
Gently grasp the handles on either side of the printer, then enhance the ink cartridge access door until it locks into place.
The carriage moves to the center of the printer.
-
Wait until the carriage is idle and silent before you continue.
-
Disconnect the power cord from the rear of the printer.
-
Disconnect the USB cablevision, if it is continued.
-
To release the ink cartridge, lift the lid on the ink cartridge slot, then gently push the lid back until it stops.
-
Pull up on the ink cartridge to remove it from the slot.
caution:
Do not remove both ink cartridges at the same time. Remove and then clean each ink cartridge one at a fourth dimension. Do not leave an ink cartridge outside the printer for more than than 30 minutes.
-
Lift the lid
-
Gently push the lid dorsum
-
Pull up on the ink cartridge
-
-
Concord the ink cartridge past its sides.
caution:
Practice not touch the copper-colored contacts or the ink nozzles. Touching these parts can result in clogs, ink failure, and bad electrical connections.
-
Lightly moisten a foam-rubber swab or lint-free cloth with distilled water, and then squeeze any excess water from it.
-
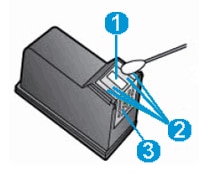
Clean the face up and edges around the ink nozzle with the swab.
caution:
Do non clean the ink nozzle plate.
-
Nozzle plate - Do non clean
-
Area surrounding ink nozzle - Practice clean
-
Ink cartridge contacts - Practice not make clean
-
-
Either permit the ink cartridge sit for x minutes to allow the cleaned area to dry, or utilise a new swab to dry information technology.
-
Concur the ink cartridge past its sides with the nozzles toward the printer, and then slide the ink cartridge forward into the slot.
-
Close the lid on the ink cartridge slot to secure the ink cartridge into identify.
-
Insert the ink cartridge
-
Close the lid
-
The colour ink cartridge is on the left, and the black ink cartridge is on the correct
-
-
Repeat these steps to clean, and then reinsert the other ink cartridge.
-
Close the ink cartridge access door.
-
Reconnect the power cord to the rear of the printer.
-
Turn on the printer, if it does non plough on automatically.
-
Try to print again, and examine the page.
If the print quality is unacceptable, keep to the adjacent footstep.
Step fourteen: Replace the trouble ink cartridge
Replace the problem ink cartridge if you saw defects on the printout and the preceding steps did not resolve the event, even if the ink cartridge is not low on ink. The problem ink cartridge is the one that printed the defects on the Print Quality Diagnostic report as described earlier in this document.
If you lot accept a lacking cartridge or printhead, information technology might be under warranty. To cheque the warranty on your ink or toner supplies, go to Printer and Page Yield Overview, and and so review the limited warranty data for your supplies.
-
Turn on the printer.
-
Brand certain to load the printer with plain, white newspaper.
-
Gently grasp the handles on either side of the printer, then enhance the ink cartridge admission door until information technology locks into place.
The railroad vehicle moves to the center of the printer.
-
Wait until the carriage is idle and silent before you go along.
-
To release the ink cartridge, lift the lid on the ink cartridge slot, then gently push the lid back until it stops.
-
Pull up on the ink cartridge to remove it from the slot.
-
Lift the lid
-
Gently push the lid back
-
Pull up on the ink cartridge
-
-
Remove 1 of the new ink cartridges from its parcel. Exist careful to simply touch on the black plastic on the ink cartridge.
-
Remove the plastic tape from the ink cartridge.
caution:
Practice not bear on the copper-colored contacts or the ink nozzles.Exercise not replace the protective tape on the contacts. Handling these parts tin outcome in clogs, ink failure, and bad electricalconnections.
-
Concord the ink cartridge past its sides with the nozzles toward the printer, then slide the ink cartridge forwards into the slot.
-
Shut the lid on the ink cartridge slot to secure the ink cartridge into place.
-
Insert the ink cartridge
-
Close the hat
-
The color ink cartridge is on the left, and the black ink cartridge is on the right
-
-
Repeat the previous steps to install the other ink cartridge, if needed.
-
Shut the ink cartridge access door.
After y'all install new ink cartridges, the printer automatically prints an alignment folio.
-
Expect for the alignment page to fully eject from the printer.
note:
Before a print job, the printer automatically extends the output tray extender. Do not push button in the output tray extender until the print job is complete.
-
Lift the scanner chapeau.
-
Place the alignment folio with the impress side downward on the scanner glass. Position it co-ordinate to the engraved guides around the glass.
-
Close the scanner chapeau, then touch OK.
The printer aligns the ink cartridges.
Try the original print job again. If the impress quality is unacceptable, go along to the side by side pace to service the printer.
Step 15: Service the printer
Service or replace your HP production if the consequence persists after completing all the preceding steps.
Become to Contact HP Customer Support to schedule a product repair or replacement. If y'all are in Asia Pacific, y'all volition be directed to a local service center in your area.
To confirm your warranty status, go to HP Product Warranty Check. Repair fees might apply for out-of-warranty products.
annotation:Go on a print sample that shows the trouble. If the ink cartridges, printhead, or printer is replaced nether warranty, the back up agent will request the print sample. If the printer is returned to HP, the print sample must be returned with the printer. Place the sample in the output tray when you package your printer for shipping.
Source: https://support.hp.com/id-en/document/c04718409
0 Response to "How to Make Desk Jet Cartridge Work Again"
Post a Comment